When I buy a costume for a holiday, my daughter in a kindergarten or school, I want to distinguish it from everyone, amaze me with a beautiful outfit. You can buy a new thing in the store, but where is the guarantee of uniqueness? It is possible to sew any costume you like at home. You need to make a little effort, patience and hard work.
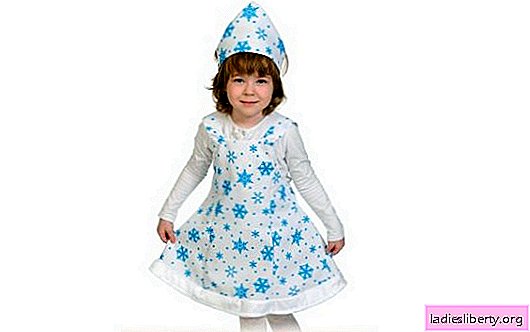
Today's master class is dedicated to the DIY Snowflake costume for a girl.
Option number 1 costume Snowflakes for girls do-it-yourself
The sewing technique of this dress is ideal for beginners. All work will occur without the use of a sewing machine. It is recommended to take children's pens to help. The labor process will be able to do it.
Materials and tools: fabric (tulle or tulle), white elastic 5 cm wide, scissors, tailor’s meter, headband, tailor pins with a hat.

Stage 1
Strips are cut from the fabric. Their width is 30 cm and their length is 50 cm. The total number of blanks required is 40 pcs. This figure is indicative and is suitable for girls of kindergarten age.
Stage 2
One cut stripe is taken into hands and chipped with a accordion-shaped pin. This action is repeated with the remaining strips.

Stage 3
A gum is sewn from a gum. To do this, measure the waist volume of the girl for a snowflake costume with her own hands. The length of the elastic is taken slightly with tension. Excess is cut off. The belt is sewn in a circle.
Stage 4
The resulting belt is pulled over the back of the chair. Each folded accordion strip is tied to a chair on a knot. It is important to tie each new strip more tightly to the previous one.

Stage 5
When all the strips are tied, the skirt straightens out.

Stage 6
A special hat is being prepared for the snowflake costume. The hoop is taken. To decorate it, strips of 3 cm wide with a length of 11 cm are cut from fabric. 60 pieces will need to be cut.
Stage 7
Each piece cut out is attached to the rim in the same way. It is recommended to tie on two knots.

Stage 8
The result was a hat for a snowflake. The sharp edges of the attached stripes spoil the view. They can be trimmed and smooth the upper edge of the head jewelry, as in the picture.

Stage 9
The outfit can be supplemented with a veil. It is sewn on Velcro to the back, as in the picture. A veil is decorated with sparkles in the form of snowflakes.

Option number 2 costume Snowflakes for girls (do it yourself)
This time, you still have to resort to using a sewing machine. It will be necessary to process the side seams and stitch together just a few parts. This version of the costume is a bit more complicated than the previous one, but is designed for the hands of a beginner in sewing.
Materials and tools: fabric (faux short-hair and long-hair white, blue velvet), scissors, tailor’s meter, headband, dressmaker pins with a hat, sewing machine, pattern paper, pencil and washing eraser, hidden white zipper, needle, thread in tone, button for a drape.

Stage 1
The illustration below translates into tracing paper. All parameters, measurements are checked on the girl for whom the suit is sewn.

Stage 2
When the pattern is ready, allowances of 0.5 - 1 cm are made.
Stage 3
The pattern is placed on the fabric and the corresponding details are cut out. The edges of the fabric can not be processed. Faux fur on the fabric itself is weakly strewed.
Stage 4
The neck is ground. On the back side there is space for inserting a hidden zipper. If desired, you can replace it with a button.
Stage 5
The suit is sewn on the sides from the wrong side.
Stage 6
At this stage, it is recommended to sew lining fabric in the snowflake costume for the girl with her own hands. It is better to use material that is pleasant and warm to the touch. All shiny fabrics are too cold for the body and unsuitable. This is an atlas, for example. Cotton, linen textile compositions are selected.
To form the lining fabric, you can use an existing pattern.
Stage 7
After the lining fabric is sewn, a hem from long-pile fur is sewn. Excess pieces of cut fur are plucked by hand. Otherwise, in the future they will interfere with laying the line.
First, the fur is pinned with pins, and then scribbled on a sewing machine. A simple straight stitch with a long stitch is selected. Selecting a stitch on a division of 0.5 to 2 will confuse the thread and interfere with the progress of the fabric. If the fur will not move well, it is recommended to reduce the presser foot or completely turn off the fabric feed by the conveyor and advance it manually.
While sewing a stitch on a typewriter, the fur hairs are folded with their fingers. You can use a wooden ruler for these purposes. Hair will not fall under the needle and tangles.
Stage 8
Cut out a pattern for a drape. It is a circle where a small circle is the girth of the neck, and a larger circle is measured at will. There is an incision on the chest of the pattern. There is no need to narrow, bend the incision.
Stage 9
The pattern is laid on blue velvet and the part is cut out. All edges are machined. Since velvet belongs to stretching fabrics and the drape is cut along the diagonal of the thread, it is better to use a “zig-zag line”.
Stage 10
From the wrong side, lining fabric is sewn to the drape. It can be sewn from shiny blue satin. Ready pattern is already available.
Stage 11
Long-pile fur is sewn along the outer edge of the cape. The technique of sewing it is already known and described above.
Stage 12
At this stage, it is required to comb the sewn long-nap fur with the usual small comb. All hairs that have fallen under the needle should be turned on the front side. Thus, the hem of the dress and drape will become more magnificent.
Stage 13
A button is sewn onto the drape.
Stage 14
From fur with a long pile for a suit of snowflakes with your own hands, you will get an elegant headdress. It is a simple strip of fur with sewn in lining fabric on the wrong side, and a wide five-centimeter elastic band is inserted inside. It is not recommended to lighten the work and fold the fur in half. This will visually increase the headgear on a fragile girl and make it bulky.
Snowflake costume is ready!